Bird Control Tips

Understand why birds love hanging out at your property, and what you can do to keep them away. Here, we discuss the various types of bird control. We also talk about things you can do other than installing bird control products, and most importantly, what works and what doesn’t work.

Different Types of Bird Deterrents and How They Work

There are 4 different types of bird deterrents that can be used at your property. They are bird spikes, bird netting, sonic bird deterrents, and visual bird deterrents. Each of these deterrents have their own advantages and disadvantages but the big question is always, do they work?

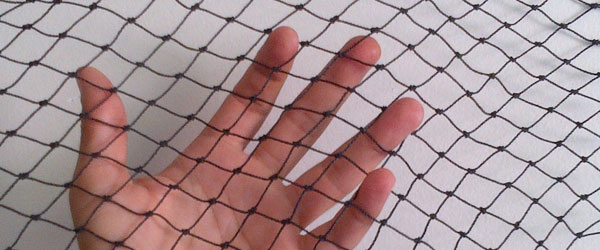
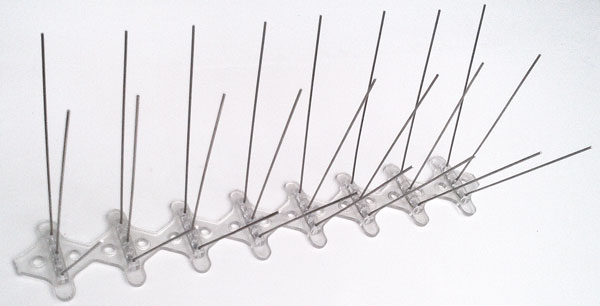
How Bird Spikes and Netting Work

Both bird spikes and bird netting work as physical deterrents. They prevent birds from entering an area or from landing or perching. This makes them very effective at keeping birds away.

The disadvantage is when the areas you need to protect are large. The costs can add up with an extensive installation so the best strategy is to look at eliminating the things that attract birds to your property first, and then install spikes or netting in the key areas you need to protect.

Find out more about bird spikes and bird netting, including where and how to install them.

How Sonic Bird Deterrents Work

Sonic or audio deterrents can use either ultrasonic sound waves or a combination of bird distress calls and bird predator calls to ward off birds. The advantage is these units can cover a large area more cost effectively than using spikes or netting.

There are a couple disadvantages. Birds will get used to these audio sounds after a while and simply ignore them or find their way into nesting and perching areas around corners or that are somewhat shielded from the noise. The other thing that tends to happen is people will complain about the sounds.

So while sonic deterrents can be effective in some very specific situations, they usually do not solve the bird problem completely or for the long term.

How Visual Bird Deterrents Work

There are a few variations of fake owls available that can be installed in a high area such as a roof ledge to scare birds away. This is the most cost effective deterrent and also the least effective.

Birds will quickly get used to the fact the owl is not a threat and ignore it. Much the same way as they get used to being around people.

How to Clean Bird Droppings Off Your Building

When a bird pest problem goes on for a period of time, bird droppings can accumulate in the areas where they nest and perch and become a real problem. Birds also have a habit of letting droppings go as they come in for a landing on roof edges – which creates a real mess along the side of buildings that is not easy to reach or clean.

Birds-making-a-mess-on-the-roof

Bird droppings should be removed prior to installing any bird deterrents such as pigeon spikes to both sanitize the area and to provide a clean surface so the caulking used can adhere to the structure.

Why is Cleaning Bird Droppings so Difficult?

Droppings from pigeons and other birds can be very difficult to remove …

  1. Hardening. Once bird droppings have had time to dry out, they can become as hard as concrete making them impossible to simply brush off. They need to be scraped or pressure washed off the surface. There are also enzyme type removers that will make it easier to remove.
  2. Acid staining. Bird droppings are very acidic, so once removed they will often leave stains, especially in painted surfaces such as building siding. While bare concrete surfaces may be pressure washed or hot water pressure washed to remove most staining, painted surfaces will most likely require a stain-blocker primer and then repainting following the cleaning.
  3. Respiratory illness. Heavy or frequent exposure to dry bird droppings can be unhealthy. The droppings may contain various bacteria or fungal diseases. The biggest risk comes from scraping dry droppings to remove them which creates a dust that can be inhaled.

Steps for Cleaning Bird Droppings

  1. Wear protective clothing. Always wear a respirator mask and gloves when cleaning bird droppings. You can also wear protective clothing such as a disposable body suit which is recommended when cleaning large amounts or conducting frequent cleanings. Persons with respiratory or immunodeficiency ailments should not conduct this type of cleaning work.
  2. Cordon off the area. Use orange safety cones, warning signs, and caution tape to block off areas so people do not walk through the area while cleaning is being done.
  3. Wear a safety harness. Always wear the proper safety harnessing and be tied off with a safety line in accordance to safety regulations when working on roof tops, near roof ledges, gutters, and any high places.
  4. Wet the droppings. Use a low pressure hose or spray bottle to thoroughly moisten the bird droppings. This will soften them up and make them easier to remove. This also controls the dust and prevents spores from becoming airborne, making them much safer to handle. If the droppings are very hard, you can also spray them down with an enzyme type bird poop remover which will soften them up and release them from the surface.
  5. Scrape up the majority of the droppings. Depending on the area and the amount, you can use a flat handheld scraper, a shovel, or a broom to gather up the droppings and put them in a sealed plastic bag for disposal.
  6. Scrub away the remaining residue. Again, keep the area damp with water. Depending on the situation, you can use a wet scrub brush or a pressure washer to clean away the remaining residue. Common bacteria killing cleaning agents can be used to fully sanitize the area once all the residue is removed.
  7. Disposal. Depending on local regulations, small amounts of bird droppings make great fertilizer and can be disposed of in your garden area, or via conventional trash disposal. Large amounts may require specialized hazardous waste disposal.

How to Remove Bird Dropping Stains

Removing the staining left behind by bird poop is more difficult than cleaning up the droppings. Because of its acidic nature, it will set in and stain most materials.

Removing Stains from Concrete and Brick

Concrete and brick are very porous substances making them very difficult to clean. In most cases pressure washing the surface will do the job, but this can drive the stain deeper into the concrete if it’s particularly bad.

An alternative method would be to use warm water with detergent and a gentle scrubbing action to loosen the staining material in the pores of the surface. Then soak up your cleaning solution by laying wood chips or a similar material over the surface. This will draw the water out of the pores and the stain with it.

Removing Stains from Painted Surfaces

The easiest way to remove bird dropping stains from painted surfaces is to repaint it. This includes painted concrete, brickwork, siding, and building flashing.

Once the area is thoroughly cleaned and dry, conduct any surface preparation that may be required. Then apply a stain blocking primer to the stained areas. This will prevent the stain from bleeding through the paint and showing up again.

Colour match and repaint the surface as normal.

Removing Stains from Other Surfaces

There are a lot of variables in which surfaces can be cleaned or not, the main one being the porosity of the material. Glass can be easily cleaned, where as banners hanging from a light post may not be able to be cleaned. Use your standard cleaning methods with stain removers where possible. Any surface or material that won’t come clean or can not be painted over, may have to be replaced.

Once you have the problem areas all cleaned up, implement your bird control plan right away to prevent further issues at your property.

What Attracts Birds to Your Property, and How to Keep them Away

Birds can be a constant nuisance … digging into garbage cans and covering everything in bird droppings. And some properties have a tough time with birds while others have no problem at all.

Installing bird spikes and bird netting is one thing you can do to keep birds away. But there are some other things you want to address around your property that will help keep our fine feathered friends away.

You want to remove the things that attract birds to your property. And what birds are attracted to is very simple:

  1. Sources of food
  2. Sources of drinking water
  3. Sources of shelter

Getting rid of these three things is sometimes not so easy, but there are some things you can do that will make a big difference.

Step 1: Keeping Birds Away by Removing Food Sources

The biggest source of food for birds at a commercial property is garbage, especially from restaurants. Birds eat many things including insects, worms, seeds, and berries. But there is not usually an abundance of these natural food sources at a property constructed of concrete, steel, and asphalt.

Garbage, on the other hand, can be a real problem. Here’s what you can do …

1. Keep your property well swept to remove debris and litter.

Keep-curbs-clean-of-debris

Debris containing dirt, seeds, and crumbs will naturally accumulate along sidewalk curbs as the wind blows it around. Keeping your curbs well swept in addition to general litter pickup is vitally important. This will stop both natural food sources and garbage that birds love from accumulating on the property. Other place such as stairwells, alcoves, and corners where debris is building up due to littering or wind movement should be kept clean as well.

2. Garbage dumpsters should be completely enclosed.

Completely-enclose-garbage

The biggest garbage source for birds is often garbage dumpsters. Having walls that surround your dumpsters for aesthetics is not enough – they should be completely enclosed to keep birds out. We suggest a mesh roof that will allow odors to escape so they don’t build up.

Step 2: Keeping Birds Away by Removing Water Sources

Birds need water for both drinking and bathing. Getting rid of stray sources of water will help you keep birds away from your property. Here is what to look at …

1. Keep your fountain well maintained

Fountains-and-water-features

Stagnant fountains and water features create a water source for birds to drink from and to bathe in. Stagnant water also attracts bugs and adds a new food source for birds. Keeping your fountain running and well maintained will help to keep birds away from this water source.

2. Repair parking lot low spots, and clear catch basins and drains

Water-accumulating-in-parking-lot

There are quite a few reasons that cause parking lot flooding. Taking care of these maintenance tasks will keep small pools and large lakes of water, and the birds away.

Make sure drainage systems and catch basins are clean and free flowing to drain water away. Fill in potholes that collect water. Re-level low spots or redirect these areas to proper drainage points

3. Check your roof for water sources

Keep-roof-drains-clear

Clogged roof drains and low spots on a flat commercial building roof can cause rain water to accumulate and attract birds to one of their favorite hangout areas. Also check rain gutters along the edge of the roof to ensure they are not clogged and water is draining away properly.

Step 3: Keeping Birds Away by Removing Shelter

This is the trickiest part of your bird control maintenance. Most of the sheltered areas birds enjoy are architectural features and can not be easily changed.

1. Remove Nesting Materials

Leaves-and-twigs-used-for-nesting

Birds love to gather leaves and twigs for nesting. Check your roof for leaves, branches, and moss buildup. These things are not only bad for the health of your roof, but birds love them. Taking good care of all your property’s landscaping to remove as much dead foliage as possible will help keep birds away by making nesting resources scarce.

2. Removing access to bird perches

Bird-perch-underneath-covered-walkway

The final tool in your bird control program is to stop birds from landing or perching on areas around your property. This is where installing bird spikes and bird netting comes in. Some of the areas you will notice birds hanging out is:

  1. Along the roof edge. This is one of their favorite landing spots
  2. On piping, and on trusses and framing that are covered such as in a parkade or covered walkway
  3. On building and window ledges on the side of the building

Once you have addressed all these common maintenance needs on your property, you will cut down on the amount of bird traffic you have. Then you can focus on the few key areas that still need bird spikes or netting without the problem seeming to be overwhelming.

What Kind of Damage Can Birds Do to Your Property?

Having an effective bird control program will greatly decrease your costs compared to maintaining the damage they can do to a property. Birds can cause all kinds of trouble to the various systems and areas of your property.

Bird-activity-on-roof

Let’s take a look at some of the areas you can check for damage:

Bird Pest Damage Checklist

  1. Check eaves troughs, roof drains, and floor drains around the property for blockage by bird droppings and nesting materials. When clogged, these areas can cause flooding and water damage
  2. Look for nests behind light fixtures that may create a fire hazard.
  3. Inspect roof top air conditioning units for signs of activity. Birds will nest near them or even inside them if the access panels are off. Especially check derelict units that may have openings in them.
  4. Check piping insulation in underground or covered parking garages, and in other covered areas for signs it has been ripped up for use as nesting material or by perching activity.
  5. Check for holes in walls, ceiling, and building soffits that may be used as a nesting place by birds.
  6. Look for bird droppings on the roof, building sides, walkways, near lamp posts and other high structures.
  7. Keep an eye on garbage enclosures and cans for signs of bird feeding.

Bird droppings are very acidic and can cause a lot of damage to your property, especially painted surfaces. And as you can see from the checklist, there are a lot of other things birds can damage on your property.

Regular inspection and maintenance of these areas will help keep birds away from your property and prevent costly maintenance down the road.

You can also implement maintenance to stop attracting birds to your property, and add bird spikes or bird netting to key areas. Now you have a complete bird control program.

How to Install Bird Netting

Bird netting is used to stop birds from perching or nesting in areas that are too large to cover with bird spikes. It is a fire resistant and rot resistant mesh that will last for many years.

Bird-netting1

Where to Install Bird Netting

The first step is to conduct a detailed inspection of your property and make note of the various areas where birds congregate. Some of these areas may be better served by installing bird spikes. For large areas with a lot of piping or truss work, it may be more effective to install netting.

Here are some of the types of areas where you can install netting:

1. Under Covered Walkway Soffits

Soffit-area-for-bird-netting

Soffits, awnings, and covered walkways with detailed frames or trusses are best protected with bird netting rather than bird spikes. There are too many areas to cover with spike strips, so netting installed along the bottom of the framing will protect everything.

2. In Covered or Underground Parking Areas

Covered-parking-area-for-bird-netting

Covered or underground parking areas can have an endless amount of piping that runs along the roof. They also have a lot of trusses and fixtures that birds can roost on. Bird Netting is the ideal solution to protecting these very large areas.

To save cost, you can install netting in stages as your budget permits. The first areas to prioritize would be over key areas where foot traffic is the heaviest such as walkways and entrances. The next priority would be over parking stalls in locations where birds seem to congregate the most.

3. Over Large Ledged Areas

Large-ledges-for-bird-netting

You may find large areas with considerably sized ledges where birds can nest. These areas might be better closed off with bird netting rather than protected by installing bird spikes on the ledge surface.

How to Install Bird Netting

Caution: Always follow approved safety procedures for working at height (on ladders, roof tops, and in other high areas) when installing bird netting. Frequently, netting is installed using a high lift such as a scissor lift or bucket truck.

Netting is very strong and flexible, and can be pulled in every direction to make sure it is tight and secure.

1. Netting Fasteners

There are a wide variety of materials netting will need to be fastened to depending on the area of installation. This includes concrete slabs, wood framed walls, and metal trusses and framing. Use the appropriate fasteners for the material you are attaching your netting to.

You can roll up excess netting on the ends and fasten it in a bunch – this helps to ensure the edges are extra strong and well sealed. You can also use thin wooden or metal slats along the edges for a clean finish to the edges of your netting installation.

2. Netting Access Zippers

Bird-netting-access-zipper

Bird netting covers wide areas and some of those areas may need to be accessible for servicing lights or other fixtures. Large commercial zippers in 3ft or 6ft lengths can be installed in the netting at these key areas so the netting can be opened and closed.

Zippers are installed after the netting is in place. Choose your zipper location and cut the netting in this area. Next, fasten both sides of the zipper to the netting using a hog ringer tool.

3. Installation

Step 1: Plan your installation carefully including how much netting you will need and where your key anchor points will be. Usually netting is attached to the structure it protects, but you can also build dedicated framing out of 1″ x 2″ wooden slats, or out of aluminum such as flat bar, square tubing, or lengths of angle.

Step 2: Start at one end and anchor the netting along that one side, pulling the netting taught as you go. Then anchor the other end of the netting, making sure it is pulled tightly into place. TIP: fasten corners and keys areas first, then add additional anchors as needed.

Step 3: Once both ends are secure, fasten each side from one end to the other, making sure the netting is pulled taught as you go.

Bird Netting Specifications

  • Material: HDPE 1mm Diameter 3×3 Rope, UV treated
  • Mesh size: 3/4″ (19mm)
  • Colour: Black (this colour is the least noticeable and the most weather resistant)
  • Netting sizes available:
    • 25 x 25ft (7.6 x 7.6m)
    • 25 x 50ft (7.6 x 15.2m)
    • 50 x 50ft (15.2 x 15.2m)
    • 50 x 100ft (15.2 x 30.5m)

To purchase bird netting online, get more information on our Bird Netting product page. Note, we also do complete installations for Property Managers in the Vancouver Lower Mainland.

How to Size Grates and Covers for Replacement

There are four main components to sizing drain grates and covers to find the correct replacement:

  1. Shape of the grate’s seat or opening. They can be round, square, rectangular, or a combination such as rectangular with rounded ends.
  2. All width and length dimensions, plus the thickness of the grate or cover
  3. The material it is made of. Common materials include cast iron, stainless steel, bronze, and plastic
  4. The position of the screw holes if there are any. These can be measured on the grate, or if the grate is missing, inside the grate seat. The number of holes and the distance from the grate edge to the center of each hole are key sizing measurements

With this information, most common grates or drain covers can be easily replaced by stock items. When a replacement is not available, we can fabricate custom drain grates or covers. This can happen when the manufacturer of an odd sized grate is no longer in business.

Installing a New Drain Cover

For covers that are held in place with screws, always clean out the screw holes before installing the cover to ensure they are clear of debris. In some circumstances, if the threads have been damaged or debris is wedged into the holes, the threads may need to be re-tapped before installing the new drain cover.

See our wide selection of grates and covers for drains, roof drains, manholes, trench drains, and water boxes.

Installing Door Stops to Protect your Walls

Wall/floor mounted handle\knob style door stop:  For positioning, put your doorstop in place, 1 to 2 inches from the door handle/knob edge side of the door. Ensure the door will open to the door stop without obstruction or within an inch of touching the wall. Mark your holes, drill and fasten to the floor. Use plastic or lead expanding plugs and screws for concrete or tile surfaces. Use wood screws for wooden sub-floors, and drywall anchors for drywall.

Door stops that have a hold-open hook: Put your doorstop in place 1 to 2 inches from the door handle/knob edge side of the door. Install the stopper in the floor first using plastic or lead expanding plugs and screws for concrete or tile surfaces, then screw the hook catch to the door. Make sure the positioning of both pieces line up correctly before installing.

See our selection of door stops in the Door Hardware section.

Tips on How to Install Signs

Installing Signs On a Wall or Building Side

There are a few things to consider when installing your signs on a wall. Two key factors are size and weight of the sign, and the type of wall you are attaching the sign to.

Installing Small Signs

For small signs on a very smooth surface wall, you can use double-sided foam tape. Apply the tape to back of the sign all around the edges in continuous strips as well as some additional strips in the center. Before you take the backing strips off, make sure you have marked where you are putting the sign. Use a level to ensure the sign is straight as you put one edge against the wall and slowly push the sign in place against the wall. Press all the edges firmly to ensure maximum adhesion.

Installing Medium Sized Signs and on Rough Surfaces

For larger signs (up to 24″ x 36″) or for rough wall surfaces, double-sided tape alone will not be enough to hold your sign securely in place. You also need a caulking gun with silicone or construction glue. Apply double-sided tape to the back of the sign along all the edges. You can also apply a few strips through the center of the sign.

Next, apply a generous  amount of silicone or glue to the center of the sign. Put the bottom edge of the sign against the wall and, with your level along that edge, slowly push the sign in place and press it firmly and evenly to ensure it is secure.

With this method, the double-sided tape will hold your sign in place while the silicone sets up. This is also a much more secure sign installation method to prevent theft or vandalism of the sign.

Installing Large Signs

Up to 48″ x 96″ full sheet alupanel signs or other materials such as glass that are quite heavy require anchors. The type of anchor depends on the type of sign and wall material.

For thin alupanel signs on concrete walls, you can use drive rivets. Pre-drill 3/8″ holes through your sign. Hold the sign in place on the wall and use a concrete drill to make a 1″ deep hole for a rivet at the top center of the sign. Insert your drive rivet and hammer it in place with a hammer.

This first rivet will hold your sign in place while you make sure it is level and drill the rest of your holes into the concrete and apply rivets as you go.

For drywall walls, use drywall anchors  instead of drive rivets.

Installing Signs on Garage Gates

Garage gate pickets are hollow to keep the weight low so the electric operator can lift the gate. Signs can be installed using self tapping screws or bolts right through the gate pickets to secure the sign.

The sign size and placement should fit within the height of a single panel. Each panel has hinges across it allowing the gate to bend as it rolls up when opening. If your sign must be higher than the height of a single panel, it should be divided into separate signs that fit within each panel.

Installing Signs with Sign Posts

We have a variety of sign brackets, posts, and sign bases for different applications. We also have a selection of security hardware to prevent theft of signs that are bolted to sign posts.

If you want to install a sign post in the ground with concrete, instead of using a surface mounted sign base, you can use the following procedure:

  1. Cut through asphalt or concrete if required using a concrete saw. Concrete sidewalks are typically at least 4″ thick and asphalt is typically 2″ to 3″ inches thick. Your hole should be 16″ x 16″ square.
  2. Dig out your 16″ x 16″ wide hole to a depth of 24″ (2 feet).
  3. Insert your sign post in the hole. Make sure it is vertically straight using a level on the side of the post and ensure it is facing the right direction.
  4. Use ready mix concrete and make up a batch in a wheelbarrow according to the instructions on the bag. Shovel it into the hole while someone ensures the post is centered and straight.
  5. Pack the concrete down and fill until the hole is full to the top. When installing your sign in a grassy area, leave a couple inches from the top free for grass to grow over the concrete. For concrete and asphalt surfaces, make the concrete level with the surrounding surface and smooth the top using a trowel.

Interior and Exterior Corner Guard Installation

The key difference between interior and exterior corner guards is the force they may be hit with. Interior corners can get hit by furniture when people are moving in or out of the building. Exterior guards are heavier duty and need to withstand being run into by cars and trucks.

Interior Corner Guards

To install corner guards you need to determine the height of the corner you want to protect. The sizes to choose from are 4’ or 8’ long. If there is floor trim or crown molding, then measure between these, cut to size using a band saw (if accessible) or a hand grinder with a metal cutting disc. To adhere to the wall, use either silicone or double sided tape and apply down either side of the back of the guard. When installing on the wall, start with one corner – align on wall and slowly slide into place.  If using silicone, apply on the wall and use painters tape strips to hold the guard to the wall for at least 24 hours before removing.

For 4 foot high guards where the top of the guard is easily visible, apply caulking along the edge to fill any gaps between the guard and the wall. You can use colour-matched caulking or clear, paintable silicone caulking which can be painted over to match the wall.

Exterior Corner Guards

Exterior guards are typically mounted on concrete pillars in underground parkades or on building corners constructed from various materials such as wood, brick, or concrete.

To mount these heavy duty guards, use wedge anchors with a countersunk nut. This will keep the guard firmly anchored and minimize any protrusions (such as bolt heads) that can get snagged if hit.

See our selection of interior and exterior corner guards.

How to Install Your Wall or Ground Mounted Bike Rack

Wall Mounted Bike Racks

First, determine how high your bike rack needs to be mounted on the wall to ensure your bike is completely off the ground when sitting on the rack. This will vary depending on the rack you are installing and the size of bikes you have.

For concrete walls such as in a parkade, mark your holes and install with 3/8″ concrete anchors.

For regular drywall, use a stud finder to locate the studs inside the wall. You want to anchor your bike rack into the studs rather than the drywall to hold the weight of the rack and your bikes. If this is not possible, cut a piece of 3/4″ plywood that can be anchored to the wall studs. You can then anchor your rack to the plywood.

Mounting Bike Rack with Plywood to Wall Studs

Ground Mounted Bike Racks

Choose a flat surface and put your bike rack in place to mark the holes for drilling. Bike racks should be spaced away from each other and other obstacles to make enough room for the bikes locked into them. A good standard is to allow a length of 6 ft for a bike This includes the depth of the bike rack.  You also want to allow an additional 3 ft aisle behind the bike to allow people to walk around the bike rack area.

Installation on Concrete

Concrete sidewalks are the most common surface that bike racks are installed on. Hammer drill the appropriate size holes for 3/8″ tap-in concrete anchors and secure the bike rack in place with your anchors.

Installation on Wooden Decks

For wooden decks constructed from beams or ties that have a small gap in between each beam, line up your bike rack so all the mounting holes sit in the center of the beams (at least 3/4″ away from the edge). Mark your holes and drill pilot holes so you can install 3/8″ or 1/2″ lag bolts without splitting the wood.

Installation on Asphalt

A section of asphalt should be cut out and replaced with a concrete footing at least 4″ deep. The bike rack can then be secured using the standard concrete anchoring procedure. Concrete footings can be painted with black paint to blend them into the surrounding asphalt.

Installation on Interlocking Pavers

The first step is to remove the pavers and dig out the layer of sand beneath them. Next, pour concrete footings or an entire concrete pad to anchor your bike rack to. The footings or pad should be even with the top of the pavers. Your pavers may need to be cut to fit around the concrete neatly.

Installation on Landscaped Areas

To secure your bike rack in a landscaped area, you will need to build a concrete pad underneath it. Choose an area the bike rack will fit in comfortably. Dig out the area and insert wooden forms around the edges of your pad location. Your forms can be built using 2″ x 4″ or 2″ x 6″ boards sitting on edge.

Your concrete pad should be at least 4″ thick and level with the surrounding ground. Once your pad is in place, you can anchor your bike rack to it as you would any concrete surface.

How to Secure Benches and Picnic Tables to Various Surfaces

Choose a flat surface and put your bench in place to mark the holes for drilling.

Installation on Concrete

Concrete sidewalks are the most common surface that benches are installed on. Hammer drill the appropriate size holes for 3/8″ tap-in concrete anchors and secure the bench in place with your anchors. For additional security to prevent theft, use one of our anti-theft removeable or non-removeable nuts.

Installation on Wooden Decks

For wooden decks constructed from beams or ties that have a small gap in between each beam, line up your bench so all the mounting holes sit in the center of the beams (at least 3/4″ away from the edge). Mark your holes and drill pilot holes so you can install 3/8″ or 1/2″ lag bolts without splitting the wood.

Installation on Asphalt

Heavy objects such as parking curbs are usually pinned in place on asphalt using 14″ long rebar spikes. For lighter objects such as benches, this will not provide adequate security. A section of asphalt should be cut out and replaced with a concrete footing at least 4″ deep. The bench can then be secured using the standard concrete anchoring procedure. Concrete footings can be painted with black paint to blend them into the surrounding asphalt.

Installation on Interlocking Pavers

Interlocking pavers or brick sidewalks create a unique challenge for anchoring benches and other site furnishings in place. The first step is to remove the pavers and dig out the layer of sand beneath them. Next, pour concrete footings or an entire concrete pad to anchor your bench to.

There are two options for finishing this kind of installation. The footings can remain under the pavers with the bricks put backin place over the footings, or the bricks can be left out with the top of the concrete footings or pad being level with the top of the surrounding pavers.

Installation on Landscaped Areas

The only way to secure your bench in a landscaped area is to build a concrete pad underneath it. Choose an area the bench will fit in comfortably. Dig out the area and insert wooden forms around the edges of your pad location. Your forms can be built using 2″ x 4″ or 2″ x 6″ boards sitting on edge.

Your concrete pad should be at least 4″ thick and level with the surrounding ground. Once your pad is in place, you can anchor your bench to it as you would any concrete surface.

See our selection of benches and picnic tables.

How to Apply Anti-Slip Tape

Step by Step Installation

  1. Make sure the surface is clean, dry, smooth and above 50 deg F (10 deg C). Reapir broken or damaged surfaces before applying anti-slip tape.
  2. Remove chipped, cracked or peeled paint. Also remove any loose rediue from the surface.
  3. Peel the protective liner back about 2″ from one end of the tape.
  4. Minimize touching the adhesive on the back of the tape with your fingers and press it firmly in place on your walking surface. Carefully peel back the protective backing as you apply the anti-slip tape.
  5. Once your tape is in place, use a rubber roller or mallet to firmly press the tape to the surface to ensure maximum adhesion. Apply extra pressure to the edges of the tape.

Installation Tips

  • On stair treads, apply anti-slip tape 1/2″ from the edge of the stair to prevent premature wear or curling of the edge of the tape.
  • To remove worn or torn tape, use a heat gun to soften the adhesive and pull the tape up from the surface.
  • When applying strips across ramped surfaces, ensure your anti-slip tape strips are between 1/2″ and 2″ apart.
  • Anti-slip tape can be applied to painted surfaces (wooden surfaces should be painted before applying), provided the paint is thoroughly dry.

See the safety department for anti-slip tape and other safety oriented solutions.

How to Install Bird Spikes

Bird spikes are your best defense for keeping birds away from your property and are widely used at commercial properties with great success.

Bird-Spikes

Frequently Asked Questions about Bird Spikes

  1. How do they work? Bird spikes are very effective at preventing birds from landing or perching in key areas such as roof ledges, trusses, lights, and piping.
  2. Are there other options? For very large areas with complex pipework or wide open spaces, you may want to install bird netting instead of bird spikes.
  3. Do they harm birds? No. Bird spikes are an annoyance that keep birds away from an area.
  4. Are they durable? Yes, they are very durable and will last for many years. The stainless steel spikes are corrosion resistant and the base is a UV treated plastic to prevent weather damage from the sun.
  5. Do they look bad? Not at all. In fact, you have seen many buildings with bird spikes installed on them and probably didn’t notice unless you were really looking for them.
  6. What about plastic spikes? Stainless steel spikes are much more durable and will last over 10 years while plastic spikes usually last only 1 to 2 years.

Next, we’ll show you where to install them and how to install them …

Where to Install Bird Spikes

Start with an inspection of your property and make note of where birds are nesting, perching or landing. Keep track of how many linear feet of space you need to protect as you go.

Here are some of the key areas you want to look at during your survey:

1. Building Roof Edges and Ledges

Bird-spikes-along-roof-edge

Birds have a habit of swooping in and landing right on the edge of a roof. This is especially true of flat roves on commercial buildings that have a short 1 or 2 foot high pony wall surrounding the roof ledge. Install your bird spikes along the outer edge of these walls.

2. Lights and Other Wall Fixtures

Bird-spikes-on-fixtures

Under covered areas such as storefront walkways you will find light fixtures, electrical boxes, and other things that birds love to nest or perch on to stay out of the weather. For large light fixtures, you will want to install 2 rows of bird spikes on top of each fixture to really dissuade birds from roosting (they love the warmth from the lights plus the cover overhead so these areas are especially enticing to them).

3. On Top of Light Poles

Bird-spikes-on-pole-lighting

Parking lot pole lights are not usually a favorite place for birds to perch, but in low wind areas where food and water is abundant, you may need to install bird spikes on top of these fixtures as well.

4. Piping in Covered Areas

Bird-spikes-on-ducting

Another favorite place for birds to perch or nest is on top of piping or ducting in covered areas. This is especially a problem for covered or underground parking areas. They can also perch on overhead canopy framing or roof trusses.

How to Install Bird Spikes

Caution: Always follow approved safety procedures for working at height (on ladders, roof tops, and in other high areas) when installing bird spikes.

There are 3 ways to secure bird spikes to various surfaces of your building or property; caulking, tie straps, and screws. Lets look at each of these methods, and where they should be used.

Method 1: Installation with Caulking

The preferred and most common method of installation is to use caulking. One tube of caulking is enough to install 10 feet of bird spikes. Bird spikes are very light and caulking will hold them very securely without creating any holes in the building or fixture surface that allow water ingress.

Bird-spikes-attached-with-caulking

Installing your bird spikes with caulking is suitable for ledges, roof flashing, light fixtures and any other flat surfaces. To install …

  1. Ensure the surface is clean and dry
  2. Lay down a thick bead of caulking where your spikes will go. You can do this a couple feet or 10 feet at a time
  3. Press your bird spikes onto the caulking firmly allowing it to ooze through the holes in the base and around the edges of the base – this will help hold them in place even more securely once the caulking is dry

Method 2: Installation with Tie Straps (also known as Zip Ties)

Tie straps are primarily used on narrow runs such as piping where birds perch. This allows you to secure the bird spikes more easily than trying to balance them on the piping while the caulking takes hold (you can install with both caulking and tie straps if needed).

Bird-spikes-attached-with-tie-straps

Tip: use black tie straps instead of white ones. Black tie straps blend in so they are less easily noticed, and they have greater resistance to sunlight and weathering. To install …

  1. Ensure the surface is clean and dry
  2. Hold a length of spikes onto the pipe and wrap a tie strap around the pipe and narrow section of the spikes’ base a couple inches from one end. Secure the strap tightly and apply additional straps. You can secure a one foot length of bird spikes with 2 or 3 tie straps

Method 3: Installation with Screws

Screws can be used in high wind areas in conjunction with caulking for an extra firm hold. They can also be used where caulking is not suitable such as surfaces where the paint is thick and flaking off – caulking will come off with the paint whereas screws penetrate the material below the surface.

Bird-spikes-attached-with-screws

You can use common 1″ wood screws and they should only be used on surfaces they can penetrate such as wooden beams or ledges. It’s also a good idea to use caulking with the screws to prevent water ingress into the mounting surface. To install …

  1. Ensure the surface is clean and dry
  2. Lay your bird spike section onto the surface and secure with 3 or more wood screws through the screw holes in the base
  3. Make sure to tighten the screws snuggly against the bird spike base, but not so much that you risk cracking the base

Bird Spike Specifications

Bird Spikes are available in 5″ and 8″ widths for different applications. Here are the specifications for each size:

5″ Bird Spike Specs

For installation on piping and on very narrow ledges and fixtures.

Available in kits (with caulking) of 10 linear feet or increments of 10 ft.

5in-spikes

  • Height: 4.5″ (11.4 cm) total including base and spikes
  • Width: 5″ (12.5 cm) span
  • Length: 12.6″ (32 cm) per one foot section
  • Weight: 1.9 oz (54 g) per linear foot
  • Spikes: Corrosion resistant surgical grade SS304 stainless steel, 0.05″ in diameter, 24 spikes per foot in 3 row fans
  • Base: Flexible UV treated recyclable polycarbonate plastic, three attachment method design (caulking, tie-straps, screws). Can be cut into smaller lengths.

8″ Bird Spike Specs

For installation on most roof top edges and other ledges.

Available in kits (with caulking) of 10 linear feet or increments of 10 ft.

8in-spikes

Height: 4.5″ (11.4 cm) total including base and spikes

  • Width: 8″ (20 cm) span
  • Length: 12.6″ (32 cm) per one foot section
  • Weight: 2.8 oz (80 g) per linear foot
  • Spikes: Corrosion resistant surgical grade SS304 stainless steel, 0.05″ in diameter, 40 spikes per foot in 5 row fans
  • Base: Flexible UV treated recyclable polycarbonate plastic, three attachment method design (caulking, tie-straps, screws). Can be cut into smaller lengths.

Choose from a variety of proven pest control solutions for commercial properties.